

Best Supply and Demand Trading Course
Discover the gateway to mastering the art of supply and demand trading course with our exclusive beginner-friendly course. Whether you’re a novice or an expert in the world of Forex trading, we have tailored this comprehensive content just for you.
With our supply and demand trading course, you’ll understand the forces that shape markets, make informed decisions, and seize profitable opportunities.
Whether you’re a beginner or experienced trader, our course is your gateway to financial independence and realizing your full potential. Don’t miss this extraordinary opportunity to transform your trading journey

Supply and Demand Trading Course Content
Our Supply and Demand Trading Course is divided into three comprehensive modules, each covering essential content to enhance your trading skills. Let’s explore what each module entails:
Module 1: Understanding Supply and Demand
Module 1 of our Supply and Demand Trading Course focuses on providing you with a solid understanding of the fundamental concepts of supply and demand in the context of trading. Let’s take a closer look at what this module covers:
1.What is Demand and Supply:
We begin by exploring the definitions of demand and supply, shedding light on how these two forces shape the market. You’ll gain clarity on the factors that drive demand and supply, as well as their impact on price movements.
2.How Demand and Supply Work:
In this section, we delve deeper into the mechanics of demand and supply. You’ll learn about the factors that influence demand, such as consumer preferences, income levels, and market trends. Similarly, we’ll explore the factors that impact supply, including production costs, availability of resources, and market competition.
3.Trading with Supply and Demand Zones in Forex:
This part of the module focuses specifically on applying the principles of supply and demand to Forex trading. You’ll discover how to identify supply and demand zones on price charts and understand their significance in determining potential entry and exit points for trades. By mastering this technique, you’ll gain a strategic edge in your Forex trading endeavors.
By completing Module 1, you’ll establish a strong foundation in understanding supply and demand, equipping you with the knowledge needed
Module 2: Advanced Strategies and Techniques
In Module 2 of our Supply and Demand Trading Course, we delve into advanced strategies and techniques that will elevate your trading skills. This module focuses on three key topics:
1. How to Draw Supply Zones:
Drawing accurate and reliable supply zones is crucial for successful trading. In this section, we provide step-by-step guidance on identifying and drawing supply zones on your price charts. You’ll learn the key factors to consider, such as historical price levels, price reactions, and trend analysis, to ensure you accurately mark these zones.
2. Finding Valid Zones:
Not all supply zones are equally significant. This section teaches you how to distinguish valid supply zones from false or weak ones. You’ll explore techniques to validate the strength and relevance of supply zones using multiple indicators and confirming price action signals. This knowledge will enable you to filter out less reliable zones and focus on high-probability trading opportunities.
3. Finding Fresh Zones:
Identifying fresh supply zones is crucial for capturing potential trading opportunities. Fresh zones refer to areas where supply and demand imbalances have recently occurred.
By mastering the techniques taught in Module 2, you’ll enhance your ability to draw accurate supply zones, identify valid zones, and pinpoint fresh trading opportunities.
Module 3: Supply and Demand Zones Patterns
In the final module of our Supply and Demand Trading Course, we dive into specific supply and demand zone patterns that can significantly impact your trading success. This module covers four key patterns:
1. Rally Base Rally:
This pattern involves a significant price increase (rally) followed by a period of consolidation (base), and then another rally. We’ll guide you on how to identify and interpret this pattern to anticipate potential price movements and make strategic trading decisions.Learn more about Rally Base Rally pattern
2. Drop Base Drop:
Contrary to the Rally Base Rally pattern, the Drop Base Drop pattern features a notable price decrease (drop), a period of consolidation (base), and then another drop. Understanding this pattern will enable you to recognize potential downtrends and capitalize on bearish trading opportunities. Learn more about DBD or Drop base Drop strategy.
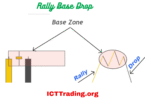
3. Rally Base Drop:
In this pattern, the price experiences a rally, followed by a consolidation phase, and then a drop. We’ll teach you how to interpret this pattern and use it to identify potential reversals or downtrends in the market.Learn more Rally Base Drop trading Strategy
4. Drop Base Rally:
The Drop Base Rally pattern involves a price decline, followed by a consolidation period, and then a rally. We’ll show you how to spot this pattern and use it as a guide for anticipating potential upward price movements or trend reversals.
By learning to recognize these supply and demand zone patterns, you’ll gain a deeper understanding of market dynamics and improve your ability to identify profitable trading opportunities. This valuable knowledge will help you become a more skilled and confident trader in the Forex market.


Leave a Comment